Roasted Veggies with Tahini Sauce
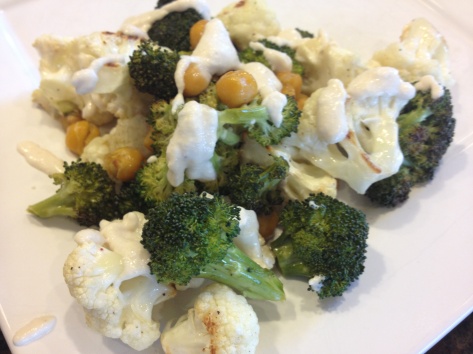
I wish I could take credit for this recipe but I can’t. I got it from http://ohsheglows.com/2013/03/05/roasted-buddha-bowl/ and only changed it a tiny bit. It is absolutely delicious and could be a stand alone meal, though we used it as a side dish. I will definitely be making this again.
(The blog I got the recipe from, Oh She Glows, is all vegan recipes and although we are not vegan, I really enjoy many of the recipes she posts. )
Roasted Veggies with Tahini Sauce
1 head broccoli, cut into bite-sized florets
1 head cauliflower, cut into bite-sized florets
1 can chickpeas, drained, rinsed, patted dry
1 Tbsp. grapeseed oil, divided
salt/pepper
Tahini Sauce
1/2 c. raw cashews, soaked*
2 Tbsp. lemon juice
1 Tbsp. tahini
1 large garlic clove
pinch salt
2-3 Tbsp. water, to thin sauce as needed
Instructions:
*To soak the cashews, you can do it overnight in a bowl covered with water or do what I did which is the quick method. Boil some water and pour over the cashews and soak for 45 minutes.
In a food processor, toss cashews, lemon juice, tahini, garlic, and salt. Puree until smooth. Add water to thin the sauce until similar to a salad dressing texture.
Line two baking sheets with parchment paper. On one, place the cauliflower and broccoli. Drizzle with oil and toss to coat. Sprinkle with slat/pepper.
On other baking sheet, place chickpeas, drizzle with oil and salt and pepper and toss to coat.
Bake veggies and chickpeas at 400 degrees for 15 minutes. Remove from oven to stir and return to oven another 10-15 minutes or until tender and just starting to brown.
Mix chickpeas and veggies in a bowl. Serve and drizzle with tahini sauce to serve. Yum!!!
Gluten-Free Tabbouleh
I needed a side-dish to have with our burgers tonight and this was healthy and delicious. It was super easy and I am excited for the left-overs tomorrow for lunch! We had it with our Gorgonzola Stuffed Burgers and Red Cabbage Sauerkraut. And, crazy enough, when I mixed together all three on my plate, it was outstanding!
Gluten-Free Tabbouleh
1 c. uncooked quinoa
2 c. vegetable broth
1 large cucumber, peeled and seeded
1 pt. grape tomatoes, halved
5 green onions, sliced thinly
1 c. finely chopped flat-leaf parsley
1/3 c. olive oil
juice of 1 lemon
salt/pepper to taste
In a small saucepan, combine quinoa and vegetable broth. Bring to a boil. Reduce heat, cover and simmer for 15 minutes. Remove from heat and set aside to cool.
In a large bowl, combine cucumber, parsley, tomatoes, onions, and cooled quinoa. In a small bowl, combine olive oil, lemon juice, and salt/pepper. Toss lemon dressing with quinoa mixture and serve cold.
First Foray into Fermented Foods!!!
“I think I am going back for seconds.”
Those are words I NEVER thought would come out of my mouth when eating sauerkraut! But, there is a first for everything. Tonight, we had our first meal with my first ever homemade batch of sauerkraut and I am impressed! This version might even get a non-kraut girl like me to eat more of those great fermented foods!
I keep hearing about how great fermented foods are for you… that can include yogurt, kefir, kombucha, and of course fermented vegetables. They contain tons of probiotics and are great for a healthy digestive system. Here is a quick article with basic info on it. I love yogurt and kefir and have even enjoyed kombucha a bit. But, I really know nothing about how to make them myself and so just buy the store versions. However, when I realized that the store-bought sauerkraut contained high-fructose corn syrup, I just couldn’t bring myself to but it and serve it to my family (i.e. my kraut-loving husband). So, I made my own!
It is super easy to do, super inexpensive, and so delicious – again, words I NEVER thought would come out of my mouth. I am taking a class on fermented foods in August and I just can’t wait to find out what else I can make at home!!!
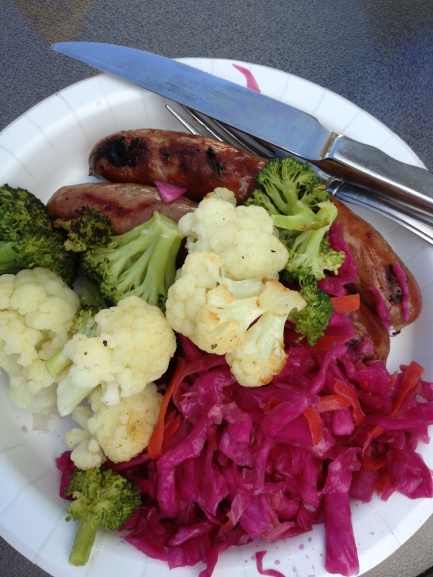
We enjoyed our sauerkraut with brats, spicy mustard, and grilled broccoli and cauliflower.
Red Cabbage Sauerkraut
1 head red cabbage, finely shredded
1/2 head green cabbage, finely shredded
2-3 large carrots, shredded
3 tsp. sea salt
half-gallon wide-mouthed mason jar
small pint mason jar
In a large bowl, combine cabbages and carrots. Sprinkle with salt.
Use your hands, not just to mix but to gently crunch the shredded vegetables. Do this until they start to release the liquid (about 5 minutes).
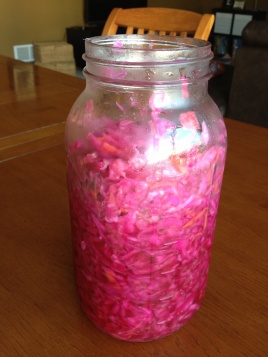
Pack the mixture into a meticulously cleaned half-gallon mason jar. Pack it down tightly, allowing the juices to rise. I had just enough to fill the jar almost to the top.
Fill the small mason jar about 3/4 full of water and place into the mouth of the large jar as a weight to hold the vegetables under the liquid. If, after putting the weight on top, the vegetables are not under water, add a few tablespoons of water until all are under water.
Cover loosely with a towel and leave sitting on the counter. Check daily to make sure the vegetables stay submerged. If small bubbles form on the surface of the liquid, skim it off. Let it ferment for at least 3-5 days before testing the flavor. We tested it after 5 days and then decided to let it sit for another couple of days. The flavor will continue to increase with each day, getting more sour and pungent as you wait.
When the sauerkraut reaches your preferred flavor, put the lid on top of the jar and place in the fridge. Enjoy for the next several months. The fermentation will slow down but not be stopped completely so the flavor will continue to mature with time.
Husband Rating: He didn’t give it a number but said it was mild but good.
Deviled Eggs (No Mayo)
I have been way behind on getting posts up so please excuse the fact that I am still going back to the 4th of July for my recipes this week…
For the 4th of July, we hosted a BBQ with some good friends. My husband wanted to do “traditional, all-American” food for the BBQ. We served BBQ Chicken breasts, Jo-Jo potato wedges, a veggie salad, and these delicious deviled eggs. But, of course, for me it isn’t that simple; I had to give all the recipes a healthy, gluten-free twist.
My mother-in-law always told me that deviled eggs were really simple to make but I just have never done it – it just doesn’t look that simple to me. But, when we went with the traditional food theme, I went for it and made my first deviled eggs. I wanted them to have no mayonnaise because I just don’t like using it. So, instead this recipe uses plain Greek yogurt along with a few other ingredients.
My husband couldn’t tell the difference and ate MANY of them that day. I loved them too and definitely will be making them again. Oh, and my mother-in-law is right – they really are easy to make.
Deviled Eggs (No mayo)
6 eggs
2 Tbsp. plain Greek yogurt
1 tsp. Dijon mustard
1 tsp. white wine vinegar
1 tsp. olive oil
splash lemon juice
1/4 – 1/2 tsp. chili powder
sea salt/fresh cracked pepper to taste
paprika to sprinkle on top
Instructions:
Hard boil eggs. My method is to place eggs in an empty pot. Cover with cold water. Bring to a boil. Boil for one minute before covering and removing from heat. Set time for 12 minutes and leave eggs in hot water for 12 minutes. When time is up, place eggs in a bowl filled with cold water and ice. Allow to fully cook before peeling.
Peel the eggs. Slice eggs in half and reserve yolks in a small bowl.
Combine all ingredients except paprika with yolks. If it seems to dry, add a splash of olive oil or lemon juice. Adjust to your taste preferences. Scoop a small amount of yolk mixture into each egg white. Sprinkle with paprika on top. Refrigerate until ready to serve.
Asian Chicken and Cabbage Salad
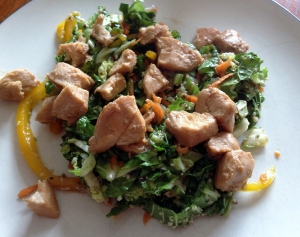
Tonight, a rare occurrence… TWO 10 out of 10 husband ratings for our meal!!! I made this delicious salad but knew that there was a pretty good chance that the little guys in my house would probably not eat much of it. So, I decided to make a nutritious green smoothie to go with the meal. Both the smoothie and the salad were AMAZING and in my humble opinion you need to make both!!! 🙂 They are so good for you.
I also love that the vegetables in this meal were all raw. Did you know that raw vegetables provide more nutrients, will keep you fuller longer, and will provide you with more energy? It takes 30% of our energy to digest a raw food meal but 60% of our energy to digest a cooked meal! A meal like this will provide all kinds of great energy, protein, nutrients, and keep you full! Awesome!
Asian Chicken and Cabbage Salad
Recipe adapted from Maximized Living Nutrition Plans, available through Maximized Living (I am not affiliated with them, just like the book!)
4 Tbsp. gluten-free organic soy sauce or tamari, divided
3 Tbsp. olive oil, divided
3 Tbsp. dark sesame oil, divided
2 Tbsp. sesame seeds, toasted
1 Tbsp. fresh ginger, grated
1 Napa cabbage, cut into thin slices
1 yellow bell pepper, cut into thin slices
1 c. shredded carrot (or about 1-2 large carrots, shredded)
2 chicken breasts
3-4 Tbsp. hulled hemp seeds
In a small bowl, combine 2 Tbsp. soy sauce, 2 Tbsp. olive oil, 2 Tbsp. sesame oil, and fresh ginger. Whisk to combine and set aside.
Cut chicken breasts into bite-sized pieces. Pour remaining 2 Tbsp. soy sauce on top and let sit for about 15 minutes. In a medium skillet, heat remaining 1 Tbsp. sesame oil and 1 Tbsp. olive oil. Do not let the pan get to hot or the oil will smoke and become rancid. Place chicken in pan and cook until no longer pink. Set aside.
In a large bowl, toss together cabbage, bell pepper, and carrots. Add chicken, dressing, and hemp seeds. Toss well to combine and enjoy cold!
(I put all of mine together minus the chicken at nap time today and didn’t cook/toss the chicken in until right before dinner so the salad sat for probably 3-4 hours before we ate it and it tasted great. I am sure it would be tasty freshly tossed as well but it is nice to have something you can make ahead of time.)
Husband Rating: 10 out of 10
Food for thought: Some nice additions to this might be some red cabbage or some raw almond slivers. But, that is my musings… my husband thought I was crazy to suggest changing any part of it when I told him my thoughts. 🙂
This could easily stand alone as a vegetarian dish if you were looking for a nice side salad for a picnic. Just leave out the chicken! It would be yummy either way!
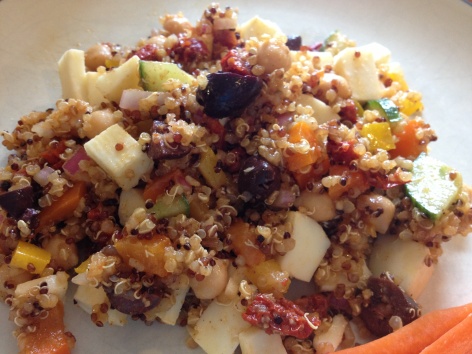
Quinoa Chickpea Salad
One of my favorite summer recipes is the Chickpea and Bulgar Salad. But, now I can no longer enjoy bulger due to my gluten intolerance. So, a revamp of that recipe was in order. The dressing is still the same but I mixed up the ingredients and came up with a combination that is delightful and easily as delicious as the original recipe. I ate it as my lunch today but it could also serve well as a side dish.
Quinoa Chickpea Salad
1 c. tri-color quinoa
2 c. vegetable broth
1 can chickpeas (garbanzo beans) drained and rinsed
1/2 c. cucumber slices
1/4 c. sundried tomatoes, dry-packed and soaked to rehydrate
1/4 c. sliced kalamata olives
1/2 yellow bell pepper, chopped
1/2 orange bell pepper, chopped
1/2 c. cubed fresh mozzarella cheese
1/2 red onion, finely diced
Dressing:
1/2 tsp. salt
1/4 tsp. ground pepper
1/4 c. lemon juice
3 cloves garlic, minced
1 tsp. grated lemon zest
1 tsp. ground cumin
1/2 tsp. paprika
1/2 tsp. ground coriander
2 Tbsp. olive oil
Instructions:
In a small sauce pan, bring vegetable broth to a boil. Rinse the quinoa in a fine mesh sieve and then add to boiling broth. Cover and reduce heat, simmering for about 10-15 minutes or until liquid is absorbed and quinoa is tender. Allow to cool.
In a large bowl, combine remaining salad ingredients. In a small bowl, whisk together dressing ingredients. Toss dressing with salad ingredients. Enjoy! (This salad tastes even better the second or third day if you have leftovers that last that long! Just give it a quick stir to redistribute any dressing that may have settled to the bottom.)
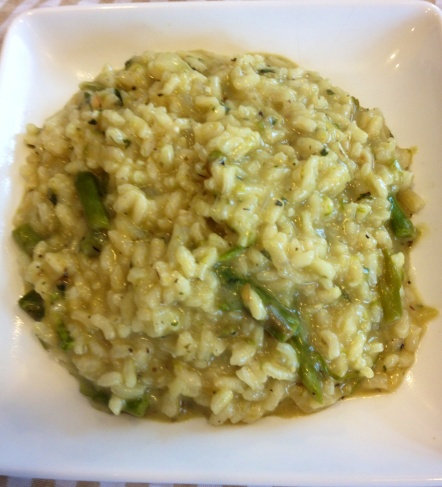
Asparagus Risotto
This was definitely the star dish of our meal! I made this along with a whole roasted chicken I made in the oven. I have this weird obsession with trying to roast whole chickens and yet they never really turn out as good as I hope they will. I think get worried about it being undercooked so much that I end up checking it too often and it dries out and is over cooked… something to work on.
But, I digress… Thank goodness we had this risotto for our meal as it was the better tasting portion! Three of the four of us loved it – check out the husband rating today… it was a first! 🙂 It was a bit putsy to make but so worth it!
Asparagus Risotto
Recipe adapted from http://laurasglutenfreepantry.com/2011/11/asparagus-risotto.html
1 tsp Celtic sea salt
2 tsp parsley
1 tsp (generous) Italian seasoning
Pepper to taste
1 Tbsp butter
2 c aborrio rice
4 c chicken broth
2 c water
1 Onion chopped
1 Asparagus bunch steamed and puréed
3 cloves garlic minced
1 Tbsp. olive oil
5 oz. grated Parmesan cheese
Steam asparagus until tender. (The easiest way to do so quickly is to place the asparagus in a Pyrex pie pan, add about 2 Tbsp. water, cover tightly with plastic wrap and microwave about 4 minutes.) Allow asparagus to cool a bit and then purée in a food processor or blender. I kept out about 1/4 c. of the asparagus to cut in small pieces to add into the risotto.
In a large pot, heat olive oil and add onion. Sauté until onion is translucent. Add garlic, risotto, and asparagus purée. Stir for about 1 minute and then add 1 c. chicken broth. Stir occasionally watching closely until broth is absorbed. Continue adding broth one cup at a time allowing it to be fully absorbed before adding more. After it is all absorbed, add water, seasonings, and cut pieces of asparagus. Continue cooking and stirring occasionally until rice is tender. Add cheese and butter. Serve!
Husband Rating: After trying a bite of this, my husband told me that if he could make love to a food, this would be it. He never gave me a numerical value to that review but I will take it as a high rating! 😉
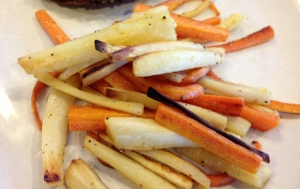
Parsnip and Carrot “Fries”
Now that I have gone gluten-free, I am realizing that my side dishes are where I need to put more thought. It was easy to depend on having some sort of carb (pasta, bread, etc.) on the side and then just cook up some veggies from the freezer. But, now without the carb side, I feel like I need to round out our meals a little more with flavoring the veggies. (BTW, you can do quinoa or brown rice for whole grain sides on a g/f diet, but I am trying to simply reduce our overall consumption of carbs at dinner.)
These “fries” were great for encouraging the kids to try. I guess it really is all in the name and presentation! 🙂
Parsnip and Carrot “Fries”
Recipe adapted from http://www.sugarfreemom.com/recipes/roasted-carrots-parsnip-fries/
1 lb. carrots, peeled and cut into matchsticks
1 lb. parsnips, peeled and cut into matchsticks
1-2 Tbsp. olive oil
sea salt/pepper to taste
In large bowl, toss carrots, parsnips, and olive oil.
Spread evenly in a single layer on a baking sheet sprayed with cooking spray.
Sprinkle with salt and pepper.
Bake at 425 degrees for 25-30 minutes until tender and slightly browned on the edges.
Serve hot.
Husband Rating:
Food for Thought: This would be tasty also tossed with either garlic or thyme.
Roasted Cauliflower with Red Pepper, Olives, and Pinenuts
This was a delicious side dish! I rarely cook cauliflower and I am not sure why… probably just the forgotten vegetable at our house. However, roasting it and serving it with all the other additions made for a delicious dish. I could have eaten just this on its own and been satisfied! (The little guys did not go for it, unfortunately… they did their requisite “no thank you” bite and were done.)
Roasted Cauliflower with Red Pepper, Olives, and Pinenuts
Recipe from www.kalynskitchen.com
1 head cauliflower
1 red bell pepper
1 Tbsp. olive oil
salt/pepper to taste
3/4 c. green olives, sliced
2 Tbsp. capers, drained
1/3 c. pine nuts
1/4 c. flat leaf parsley, chopped
In a large bowl, combine cauliflower and bell pepper. Toss with olive oil and salt/pepper. Spread evenly on a baking sheet. Roast at 425 degrees for about 20 minutes.
Remove cauliflower and pepper from oven and return to large bowl. Toss with olives, capers, pine nuts, and parsley. Spread once again on baking sheet and bake another 10-15 minutes or until olives look slightly cooked and vegetables look lightly browned.
Serve hot.
Husband Rating: 9 out of 10 (when served with the Balsamic Onion Pot Roast.)
Easiest, Most Delicious Salsa Ever!!!
Phew! It’s been a long time since I have been able to blog… We FINALLY have our computer back and in working order! After a new charger, DVD/CD drive, and a whole new hard drive, our PC has been completely overhauled and is like brand new again! So, I will hopefully get back to blogging again on a regular basis! I have about a dozen unfinished posts waiting to be given the final touches and posted. For now, here is one that was easy to finish up.
I didn’t come up with this recipe. I didn’t change it from the original recipe it all. I take no credit for how delicious and easy this recipe is. But, it is just so easy and delicious that I had to share it with you! I could eat it by itself – it was SOOOO good! I want to put it on everything. (And, the meal that it is paired with (Pork Carnitas Tacos) is amazing as well! You should make it! We all LOVED it and raved about it!)
Tomatillo Salsa
Recipe from http://www.100daysofrealfood.com/2011/08/01/recipe-pork-carnitas-tacos-with-tomatillo-salsa/
1 1/2 lbs. tomatillos
1 smallish white onion, roughly chopped
3/4 c. chopped cilantro leaves
1 Tbsp. lime juice
1 jalapeno, seeded and roughly chopped
Instructions:
Preheat broiler on high.
Peel tomatillos and slice in half. Place on a baking sheet covered in foil, sliced side down. Broil for 5-7 minutes or until the skin is lightly blackened.
Place tomatillos, onion, cilantro, lime juice, and jalapeno in a food processor or blender. (I used our Magic Bullet, with it’s blender attachment.)
Blend until desired consistency – for me, lightly chunky. Allow to cool in the refrigerator. Salsa can be stored in a sealed container for up to 5 days.
Put it on everything – seriously! That is what I plan to do. It’s that delicious!!!!
